
5 Snow-inspired Projects to Keep You Busy this Winter
Snow has fallen, trees are bare, and temperatures are below 40 degrees: all classic signs that it’s winter here in Boston! Though it’s cold outside, and you probably don’t want to spend too much time out there, we have a few ways to keep busy inside. Beat that winter boredom with these snow-inspired, kid-friendly activities.
1. DIY Hot Chocolate Dipping Spoons
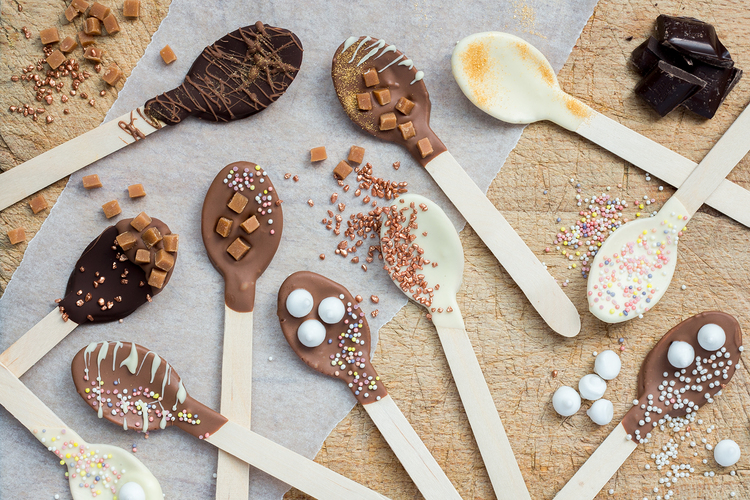
(Photo via The Kitchen Alchemist)
Hot chocolate has a history of comfort and rejuvenation, so it makes sense that the drink is a winter favorite. There are many ways to enjoy a steaming cup, but for an added zing, try making your own hot chocolate dipping spoons. When you swirl one of these in your drink, they will melt and add a hint of caramel, mint, or whatever else you choose to cover your spoons with. Follow these instructions to step up your hot chocolate game!
Materials:
- Plastic Spoons
- Wax Paper
- Microwave (parental supervision required for young children)
- Microwave safe bowl
- Chocolate chips, mint chocolate chips, white chocolate chips, caramel chips, butterscotch chips (any flavor you would like to add to your hot cocoa)
- Marshmallows, crushed candy canes, sprinkles, sea salt, etc. to decorate your spoons (try to think of small treats that would taste good in hot chocolate and fit on the spoon
Instructions:
- Place all of your materials in front of you so they are ready to go.
- Place your flavored chips in the microwave safe bowl. Tip: we suggest starting out with a ½ cup of chips unless you are making a big batch.
- Melt your chips. Microwave chips on high for 1 minute. Then, stir the chips and put it back in for 30-second intervals at a time until the chips are completely melted.
- Dip your plastic spoon into the melted chips and completely cover the mouth part of the spoon.
- Lay spoon on a sheet of wax paper to dry.
- While your spoon is drying, place your candy toppings/decorations on the spoon before it completely dries.
When everything is dry, your spoon is ready to swirl in your hot chocolate. Enjoy combos like salted caramel (melted caramel chips + sea salt) or mint chocolate (melted chocolate chips + crushed candy canes). We were inspired by Alpha Mom
2. DIY Mason Jar Snow Globe
(Video via PBS)
Let it snow—outside, so you can stay nice and warm inside! The great thing about a snowy, winter day, is that you don’t have to leave your house if you don’t want to; and on many occasions, you are actually advised to stay home because of driving conditions. To capture the essence of a beautiful, snowy day without stepping foot in in the cold, try making your own snow globe! You can make any kind of snow globe you’d like using different sizes of jars and figurines.
Materials:
- Any size jar. Tip:#upcycle old salsa or jelly jars instead of buying new mason jars.
- Plastic figurine for inside the snow globe
- Water and/or Glycerin (you can find this at most pharmacies like CVS as “skin protectant”)
- Glitter
- Hot glue or super glue
Instructions:
- Glue the figurine to the inside of the jar lid and set aside to dry. When you close the jar, the glued on figurine should hang upside down in the jar.
- Take your empty jar and fill it with a mixture of water and glycerin. The glycerin will help the sparkles float in the water instead of sticking to the glass. The more glycerin, the better.
- Add about a teaspoon of glitter to the water mixture.
- Screw the lid onto the jar tightly; glue the lid to the jar to prevent leaks. Tip: Give your snow globe a quick shake before gluing shut; you may want to add more glycerin to help the glitter float more freely.
Your snow globe is now ready to show off! Shake them around and watch as the glitter snow whirls around inside.
3. Coffee Filter Snowflakes
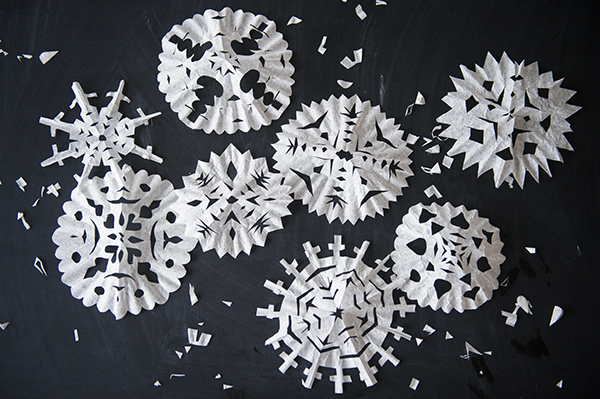
(Photo via Chasing Saturdays)
Transform your indoor space into a winter wonderland with decorative snowflakes made out of coffee filters. Why coffee filters? They happen to be the perfect size and shape for making snowflakes; it saves you the trouble of cutting out circles from rectangular pieces of paper. Follow these instructions to make your own!
Materials
- Paper coffee filters
- Scissors
- Markers, crayons, etc. for decorating (optional)
- String for stringing your snowflakes when they are finished
Instructions
- Place a coffee filter in front of you.
- Fold your coffee filter in half as many times as you’d like. Tip: the more times you fold it the more times your pattern will appear on the snowflake.
- Cut out different shapes from your folded filter.
- Unfold the filter to reveal your unique snowflake design
When you have the snowflake pattern you like, string your snowflakes together as garland or space them out in different areas of the room. For even more fun, add glitter, paint, or color on the snowflake.
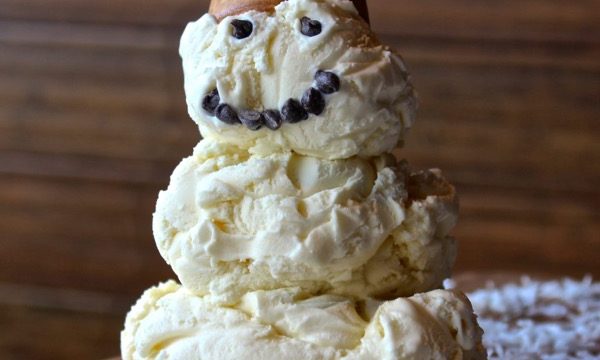
4. Snowman Sundae
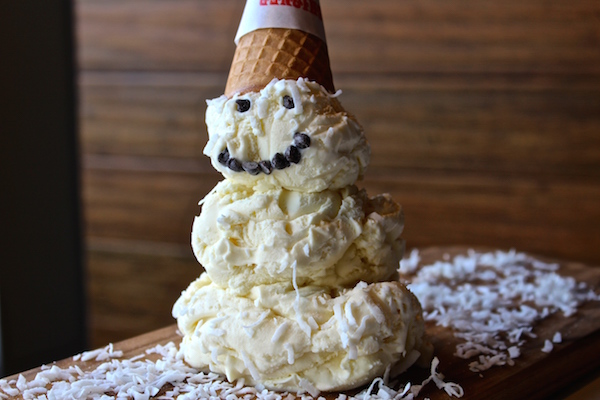
Of course we are going to suggest something with ice cream; it’s always a good time when ice cream is involved! Make a whimsical snowman sundae the next time you have a snow day. We guarantee you smiles all around. And if you need supplies for this—like locally-made ice cream, tasty candy toppings, or gooey hot fudge—you know where to find us!
Materials:
- Any flavor of hard ice cream (the kind you scoop, not the kind from a machine)
- Dry toppings like M&Ms, Reese’s Pieces, gummy bears, etc.
- Soft toppings like hot fudge, peanut butter, or caramel
- Bowl/Plate
- Spoon
Instructions:
- Add one very large scoop of ice cream to a bowl or plate.
- Add two more scoops on top of that, slightly decreasing the size of the scoop each time to mimic the classic snowman shape. Tip: if the ice cream starts to melt after you scoop it, you can put your bowl or plate in the freezer for about 10 minutes or so until it freezes back together.
- Once your snowman shape is secure, start adding a face using different types of toppings. (We used M&Ms and gummy bears on ours.)
- Continue decorating your snowman until it looks the way you want.
Congrats, you’ve finished your snowman sundae. Dig in!
5. Toothpick Structures
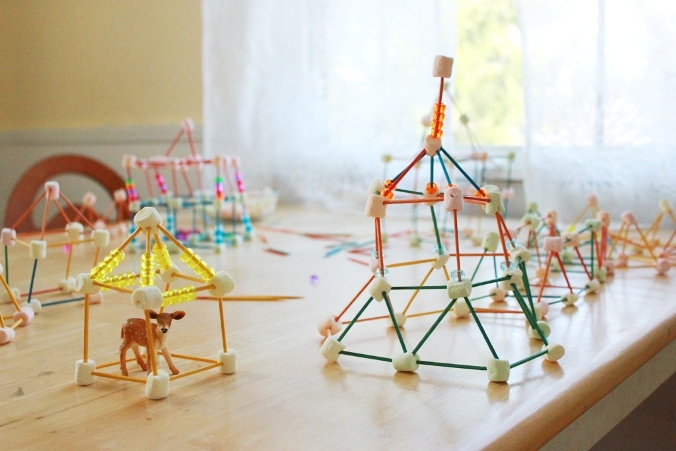
(Photo via The Artful Parent)
Have marshmallows or gumdrops lying around the house? Turn them into a young architect’s dream: use them to create toothpick structures. We remember making these in elementary school–the possibilities are endless!
Materials
- Toothpicks
- Mini marshmallows, gum drops, etc. to hold toothpicks together.
- Pony beads or kid-safe plastic beads (optional for decorations)
Instructions
- Lay out your materials in front of you at your workspace.
- Think of a design concept and begin to construct your sculpture by sticking a marshmallow on both sides of a toothpick. Then, start adding more toothpicks on to that. The key here is to use the marshmallows or other material as the corners of the sculpture to hold everything together.
- Keep adding on toothpicks until you have reached your sculpture goal. Add some beads to your toothpicks for added flair.
Now it’s time to show off your masterpiece!
Lastly,
if you are going stir-crazy in the house and don’t mind the frosty air, get out and play in the snow! Make sure to bundle up so you stay warm and safe. You can make a *real* snowman or snow castle using sand toys (like you would bring to the beach) to form shapes in the snow.
And if all else fails, and you find yourself with nothing to do, enjoy our coloring page below!
Want to order ice cream from Chill on Park and have it delivered right to your door? We are now on GrubHub! Click the button in the top right corner of our website to start your order today! Call us at (617) 297-5401 to learn more.
You must be logged in to leave a reply.